
OSGi(Open Service Gateway Initiative)是面向Java的动态模型系统,使用OSGi可以进行模块的动态加载,无需停止重启服务器,而模块就是我们下面要开发的Bundle。OSGi在电信或其他大型企业里面用的比较多,Eclipse现在也是用osgi的方式来添加插件。
IntelliJ IDEA的OSGi环境搭建
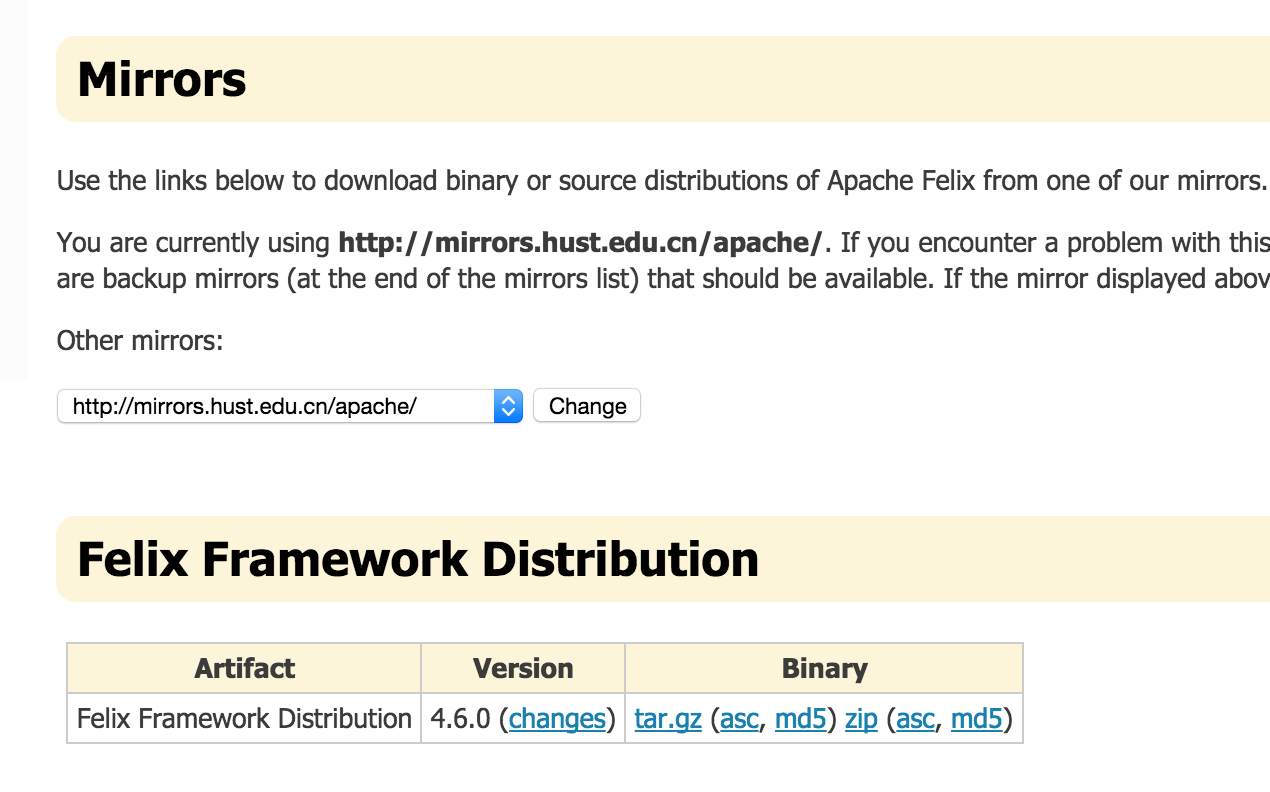
- 我们使用Felix这个OSGi框架来进行OSGi代码的开发,首先我们下载最新版本的Felix包并解压
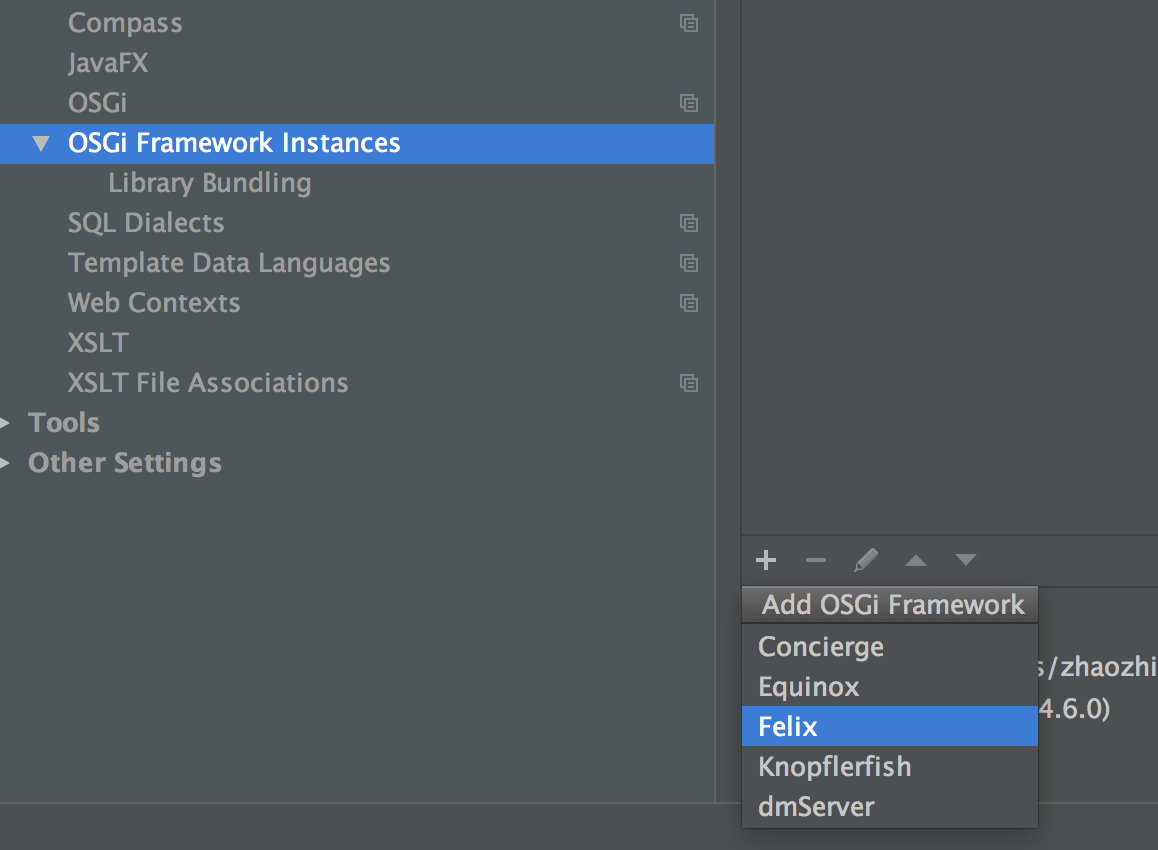
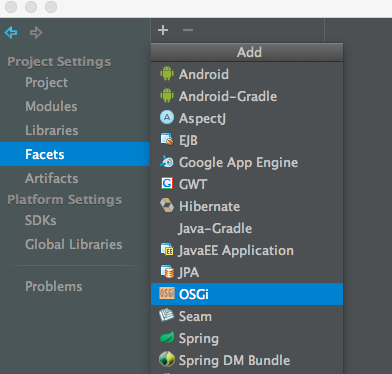
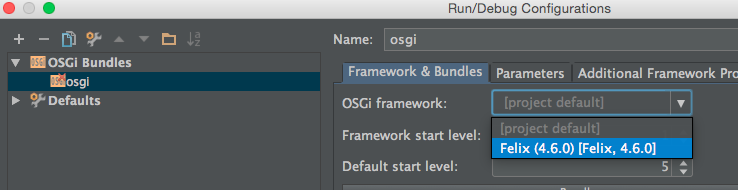
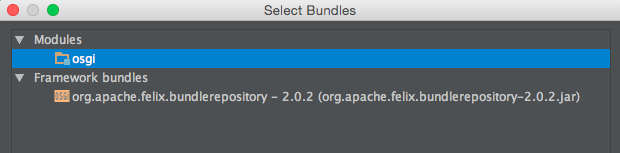
- 在IDEA进行OSGi的设置,选择刚才解压好的felix目录

HelloActivator.java1
2
3
4
5
6
7
8
9
10
11
12
13
14
| package com.zzm.osgi;
import org.osgi.framework.BundleActivator;
import org.osgi.framework.BundleContext;
public class HelloActivator implements BundleActivator {
public void start(BundleContext bundleContext) throws Exception {
System.out.println("Hello World Bundle started!");
}
public void stop(BundleContext bundleContext) throws Exception {
System.out.println("Hello World Bundle stop!");
}
}
|
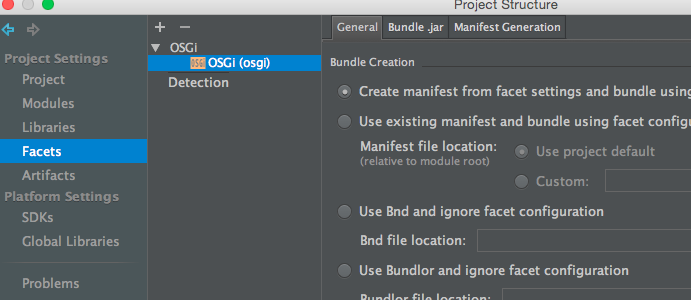
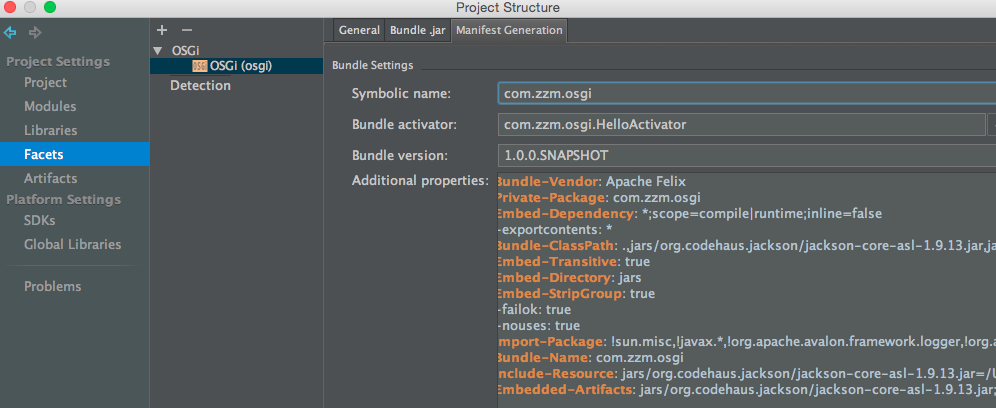
- 在工程设置页面进行设置,写上bundle对应的Activator
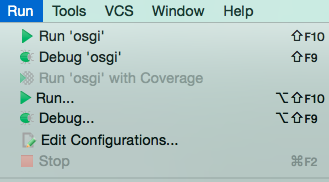
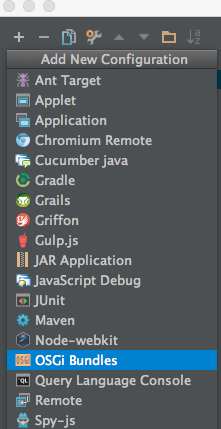
- 在Run菜单中添加osgi的运行配置,Run->Edit Configurations…


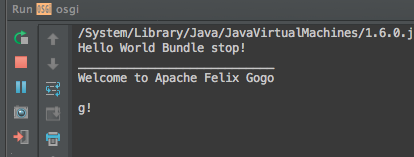
可以看到IDEA已经帮我们自动启动了我们的Activator,打印了Hello World Start的语句。
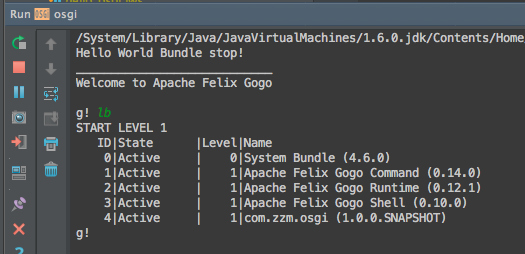
输入lb查看所有bundle的信息,可以看到最下面是我们的bundle,已经激活。
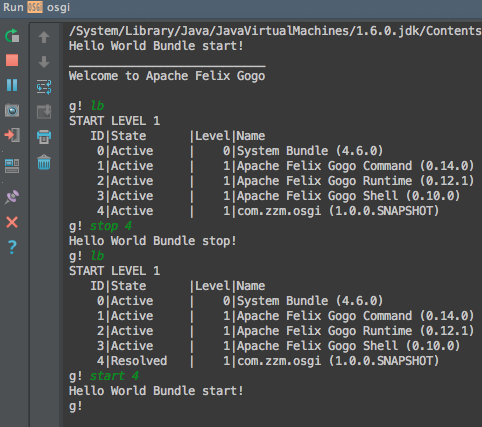
我们停掉bundle,再显示所有bundle状态,可以看到我们的bundle的状态已经是Resolved了。
使用felix的Maven Bundle插件来创建bundle
上面是通过IDE来启动和创建bundle,我们再来看下使用felix maven插件的方式创建bundle,这里是官网地址说明: http://felix.apache.org/site/apache-felix-maven-bundle-plugin-bnd.html。
- 首先新建Maven的pom.xml文件
- 在dependencies加入felix的jar包,最新的版本是1.4.0
- 在plugin中定义我们的bundle,包括我们的Activator等信息。
- packaging需要修改为
bundle
pom.xml1
2
3
4
5
6
7
8
9
10
11
12
13
14
15
16
17
18
19
20
21
22
23
24
25
26
27
28
29
30
31
32
33
34
35
36
37
38
39
40
41
42
| <?xml version="1.0" encoding="UTF-8"?>
<project xmlns="http://maven.apache.org/POM/4.0.0"
xmlns:xsi="http://www.w3.org/2001/XMLSchema-instance"
xsi:schemaLocation="http://maven.apache.org/POM/4.0.0 http://maven.apache.org/xsd/maven-4.0.0.xsd">
<modelVersion>4.0.0</modelVersion>
<groupId>com.zzm</groupId>
<artifactId>osgi</artifactId>
<version>1.0-SNAPSHOT</version>
<packaging>bundle</packaging>
<build>
<plugins>
<plugin>
<groupId>org.apache.felix</groupId>
<artifactId>maven-bundle-plugin</artifactId>
<version>2.4.0</version>
<extensions>true</extensions>
<configuration>
<instructions>
<Bundle-SymbolicName>${pom.groupId}.${pom.artifactId}</Bundle-SymbolicName>
<Bundle-Vendor>Apache Felix</Bundle-Vendor>
<Bundle-Activator>com.zzm.osgi.HelloActivator</Bundle-Activator>
<Private-Package>com.zzm.osgi</Private-Package>
</instructions>
</configuration>
</plugin>
</plugins>
</build>
<dependencies>
<dependency>
<groupId>org.apache.felix</groupId>
<artifactId>org.osgi.core</artifactId>
<version>1.4.0</version>
<scope>provided</scope>
</dependency>
</dependencies>
</project>
|
- 还是使用我们之前的Activator,在工程根目录下使用maven进行打包,打包完后可以在target目录下面看到打好的bundle包。
1
2
3
4
5
6
7
8
9
10
11
12
13
14
15
16
17
18
19
20
21
22
23
24
25
26
27
28
29
30
| $ mvn clean install
...balabala
[INFO]
[INFO] --- maven-bundle-plugin:2.4.0:bundle (default-bundle) @ osgi ---
[INFO]
[INFO] --- maven-install-plugin:2.5.2:install (default-install) @ osgi ---
[INFO] Installing /Users/zhaozhiming/projects/hello_osgi/bundles/osgi-1.0-SNAPSHOT.jar to /Users/zhaozhiming/.m2/repository/com/zzm/osgi/1.0-SNAPSHOT/osgi-1.0-SNAPSHOT.jar
[INFO] Installing /Users/zhaozhiming/projects/hello_osgi/pom.xml to /Users/zhaozhiming/.m2/repository/com/zzm/osgi/1.0-SNAPSHOT/osgi-1.0-SNAPSHOT.pom
[INFO]
[INFO] --- maven-bundle-plugin:2.4.0:install (default-install) @ osgi ---
[INFO] Installing com/zzm/osgi/1.0-SNAPSHOT/osgi-1.0-SNAPSHOT.jar
[INFO] Writing OBR metadata
[INFO] ------------------------------------------------------------------------
[INFO] BUILD SUCCESS
[INFO] ------------------------------------------------------------------------
[INFO] Total time: 3.898s
[INFO] Finished at: Sat Jan 31 10:44:49 HKT 2015
[INFO] Final Memory: 18M/216M
[INFO] ------------------------------------------------------------------------
$ cd target
$ ls -l
total 8
drwxr-xr-x 4 zhaozhiming staff 136 Jan 31 10:57 classes
drwxr-xr-x 3 zhaozhiming staff 102 Jan 31 10:57 maven-status
-rw-r--r-- 1 zhaozhiming staff 2901 Jan 31 10:57 osgi-1.0-SNAPSHOT.jar
drwxr-xr-x 4 zhaozhiming staff 136 Jan 31 10:57 surefire-reports
drwxr-xr-x 3 zhaozhiming staff 102 Jan 31 10:57 test-classes
|
- 打完包后,在target/classes/META-INF目录下,可以看到maven会产生一个MANIFEST.MF文件,显示了bundle的具体信息。
MANIFEST.MF1
2
3
4
5
6
7
8
9
10
11
12
13
14
15
| Manifest-Version: 1.0
Bnd-LastModified: 1422673028905
Build-Jdk: 1.8.0_25
Built-By: zhaozhiming
Bundle-Activator: com.zzm.osgi.HelloActivator
Bundle-ManifestVersion: 2
Bundle-Name: osgi
Bundle-SymbolicName: com.zzm.osgi
Bundle-Vendor: Apache Felix
Bundle-Version: 1.0.0.SNAPSHOT
Created-By: Apache Maven Bundle Plugin
Export-Package: com.zzm.osgi;uses:="org.osgi.framework";version="1.0.0.S
NAPSHOT"
Import-Package: org.osgi.framework;version="[1.5,2)"
Tool: Bnd-2.1.0.20130426-122213
|
1
2
3
4
5
6
7
8
9
10
11
12
13
14
15
16
17
18
19
20
21
22
23
24
25
26
27
28
29
30
31
32
33
34
35
36
37
38
39
40
41
42
43
44
45
46
47
48
49
50
51
52
53
54
55
56
57
58
59
60
61
62
63
64
65
66
67
68
|
$ cp osgi-1.0-SNAPSHOT.jar /your/felix/parent/folder
$ cd /your/felix/parent/folder
$ ls
drwxr-xr-x@ 12 zhaozhiming staff 408 Jan 30 13:39 felix
-rw-r--r-- 1 zhaozhiming staff 2901 Jan 31 11:18 osgi-1.0-SNAPSHOT.jar
$ cd felix
$ java -jar bin/felix.jar
____________________________
Welcome to Apache Felix Gogo
g!
g! lb
START LEVEL 1
ID|State |Level|Name
0|Active | 0|System Bundle (4.6.0)
1|Active | 1|Apache Felix Bundle Repository (2.0.2)
2|Active | 1|Apache Felix Gogo Command (0.14.0)
3|Active | 1|Apache Felix Gogo Runtime (0.12.1)
4|Active | 1|Apache Felix Gogo Shell (0.10.0)
5|Active | 1|Sample01 (1.0.0.SNAPSHOT)
g! install file:../osgi-1.0-SNAPSHOT.jar
Bundle ID: 253
g! lb
START LEVEL 1
ID|State |Level|Name
...
253|Installed | 1|osgi (1.0.0.SNAPSHOT)
g! start 253
Hello World Bundle start!
g! lb
START LEVEL 1
ID|State |Level|Name
...
253|Active | 1|osgi (1.0.0.SNAPSHOT)
g! stop 253
Hello World Bundle stop!
g! lb
START LEVEL 1
ID|State |Level|Name
...
253|Resolved | 1|osgi (1.0.0.SNAPSHOT)
g! uninstall 253
g! lb
START LEVEL 1
ID|State |Level|Name
0|Active | 0|System Bundle (4.6.0)
1|Active | 1|Apache Felix Bundle Repository (2.0.2)
2|Active | 1|Apache Felix Gogo Command (0.14.0)
3|Active | 1|Apache Felix Gogo Runtime (0.12.1)
4|Active | 1|Apache Felix Gogo Shell (0.10.0)
5|Active | 1|Sample01 (1.0.0.SNAPSHOT)
|
在bundle中添加第三方包
在bundle中使用第三方包比较麻烦,查看了各方资料,只找到了把第三方jar包一起打进bundle的方法,我们以引入guava包为例,下面代码加注释的就是修改的地方。
pom.xml1
2
3
4
5
6
7
8
9
10
11
12
13
14
15
16
17
18
19
20
21
22
23
24
25
26
27
28
29
30
31
32
33
34
35
36
37
38
39
40
41
42
43
44
45
46
47
48
49
50
51
52
53
54
55
56
57
58
59
60
61
62
63
64
65
66
67
68
69
70
71
72
73
74
75
76
| <?xml version="1.0" encoding="UTF-8"?>
<project xmlns="http://maven.apache.org/POM/4.0.0"
xmlns:xsi="http://www.w3.org/2001/XMLSchema-instance"
xsi:schemaLocation="http://maven.apache.org/POM/4.0.0 http://maven.apache.org/xsd/maven-4.0.0.xsd">
<modelVersion>4.0.0</modelVersion>
<groupId>com.zzm</groupId>
<artifactId>osgi</artifactId>
<version>1.0-SNAPSHOT</version>
<packaging>bundle</packaging>
<build>
<plugins>
<plugin>
<groupId>org.apache.felix</groupId>
<artifactId>maven-bundle-plugin</artifactId>
<version>2.4.0</version>
<extensions>true</extensions>
<configuration>
<instructions>
<Bundle-SymbolicName>${pom.groupId}.${pom.artifactId}</Bundle-SymbolicName>
<Bundle-Vendor>Apache Felix</Bundle-Vendor>
<Bundle-Activator>com.zzm.osgi.HelloActivator</Bundle-Activator>
<Private-Package>com.zzm.osgi</Private-Package>
<Embed-Dependency>
*;scope=compile|runtime;inline=false
</Embed-Dependency>
<_exportcontents>*</_exportcontents>
<Bundle-ClassPath>.,{maven-dependencies}</Bundle-ClassPath>
<Embed-Transitive>true</Embed-Transitive>
<Embed-Directory>jars</Embed-Directory>
<Embed-StripGroup>true</Embed-StripGroup>
<_failok>true</_failok>
<_nouses>true</_nouses>
</instructions>
</configuration>
</plugin>
<plugin>
<artifactId>maven-dependency-plugin</artifactId>
<executions>
<execution>
<id>copy-dependencies</id>
<phase>package</phase>
<goals>
<goal>copy-dependencies</goal>
</goals>
<configuration>
<outputDirectory>jars</outputDirectory>
</configuration>
</execution>
</executions>
</plugin>
</plugins>
</build>
<dependencies>
<dependency>
<groupId>org.apache.felix</groupId>
<artifactId>org.osgi.core</artifactId>
<version>1.4.0</version>
<scope>provided</scope>
</dependency>
<dependency>
<groupId>com.google.guava</groupId>
<artifactId>guava</artifactId>
<version>18.0</version>
</dependency>
</dependencies>
</project>
|
HelloActivator.java1
2
3
4
5
6
7
8
| public class HelloActivator implements BundleActivator {
public void start(BundleContext bundleContext) throws Exception {
System.out.println("Hello World Bundle start!");
List<String> strings = Lists.newArrayList("I", "use", "guava", "here");
System.out.println(strings);
}
...
}
|
1
2
3
4
5
6
7
8
9
10
11
12
| $ mvn clean install
$ cp osgi-1.0-SNAPSHOT.jar /your/felix/parent/folder
$ cd /your/felix/parent/folder
$ java -jar bin/felix.jar
____________________________
Welcome to Apache Felix Gogo
g! install file:../osgi-1.0-SNAPSHOT.jar
Bundle ID: 258
g! start 258
Hello World Bundle start!
[I, use, guava, here]
|
1
2
3
4
5
6
7
8
9
10
11
| $ mkdir jar_tar
$ cp osgi-1.0-SNAPSHOT.jar jar_tar/
$ cd jar_tar/
$ tar -xvf osgi-1.0-SNAPSHOT.jar
$ ls -l
drwxr-xr-x 4 zhaozhiming staff 136 Jan 31 11:56 META-INF
drwxr-xr-x 3 zhaozhiming staff 102 Jan 31 11:44 com
drwxr-xr-x 3 zhaozhiming staff 102 Jan 31 11:44 jars
-rw-r--r-- 1 zhaozhiming staff 1998876 Jan 31 11:55 osgi-1.0-SNAPSHOT.jar
$ ls -l jars
-rwxr-xr-x 1 zhaozhiming staff 2256213 Jan 30 10:07 guava-18.0.jar
|
1
2
3
4
5
6
7
8
9
10
11
12
13
14
15
16
17
18
19
20
21
22
23
24
25
26
27
28
29
30
31
32
33
| Manifest-Version: 1.0
Bnd-LastModified: 1422675843327
Build-Jdk: 1.8.0_25
Built-By: zhaozhiming
Bundle-Activator: com.zzm.osgi.HelloActivator
Bundle-ClassPath: .,jars/guava-18.0.jar
Bundle-ManifestVersion: 2
Bundle-Name: osgi
Bundle-SymbolicName: com.zzm.osgi
Bundle-Vendor: Apache Felix
Bundle-Version: 1.0.0.SNAPSHOT
Created-By: Apache Maven Bundle Plugin
Embed-Dependency: *;scope=compile|runtime;inline=false
Embed-Directory: jars
Embed-StripGroup: true
Embed-Transitive: true
Embedded-Artifacts: jars/guava-18.0.jar;g="com.google.guava";a="guava";v
="18.0"
Export-Package: com.google.common.annotations;version="18.0.0",com.googl
e.common.base;version="18.0.0",com.google.common.base.internal;version=
"1.0.0.SNAPSHOT",com.google.common.cache;version="18.0.0",com.google.co
mmon.collect;version="18.0.0",com.google.common.escape;version="18.0.0"
,com.google.common.eventbus;version="18.0.0",com.google.common.hash;ver
sion="18.0.0",com.google.common.html;version="18.0.0",com.google.common
.io;version="18.0.0",com.google.common.math;version="18.0.0",com.google
.common.net;version="18.0.0",com.google.common.primitives;version="18.0
.0",com.google.common.reflect;version="18.0.0",com.google.common.util.c
oncurrent;version="18.0.0",com.google.common.xml;version="18.0.0",com.g
oogle.thirdparty.publicsuffix;version="1.0.0.SNAPSHOT",com.zzm.osgi;ver
sion="1.0.0.SNAPSHOT",jars;version="1.0.0.SNAPSHOT"
Import-Package: javax.annotation,org.osgi.framework;version="[1.5,2)",su
n.misc
Tool: Bnd-2.1.0.20130426-122213
|
PS:在Import-Package中有sun.misc的字样,表示bundle引入了jdk的一些包,有时候在运行bundle的时候会看到下面的错误:
1
| org.osgi.framework.BundleException: Unresolved constraint in bundle [8]: Unable to resolve 8.0: missing requirement [8.0] osgi.wiring.package; (osgi.wiring.package=sun.misc)
|
解决办法有2个,执行解决办法意味着你清楚并明确运行bundle时可以缺少这些包:
way1:是在pom文件中的中加入!sum.misc,这样打出来的MANIFEST.MF的Import-Package就不会有sun.misc字样了。
pom.xml1
2
3
4
5
6
7
8
9
| <Bundle-SymbolicName>${project.groupId}.${project.artifactId}</Bundle-SymbolicName>
<Bundle-Vendor>joyotime</Bundle-Vendor>
<Bundle-Version>${project.version}</Bundle-Version>
<Bundle-Activator>com.morewifi.chinatelecom.MoreWifiActivator</Bundle-Activator>
<Private-Package>com.morewifi.chinatelecom</Private-Package>
...
<Import-Package>
!sun.misc,*
</Import-Package>
|
way2:在felix解压包下有个conf/config.properties文件,在里面配置缺少的包。
felix/conf/config.properties1
| org.osgi.framework.system.packages.extra=sun.misc
|
在bundle中保存文件
有时候在bundle中需要写一些数据到文件保存起来,可以使用bundleContext的getDataFile方法来获取文件,下面代码使用了guava的io方法。
HelloActivator.java1
2
3
4
5
6
7
8
9
10
11
12
13
14
15
16
| public class HelloActivator implements BundleActivator {
public void start(BundleContext bundleContext) throws Exception {
System.out.println("Hello World Bundle start!");
List<String> strings = Lists.newArrayList("I", "use", "guava", "here");
System.out.println(strings);
File dataFile = bundleContext.getDataFile("save.txt");
Files.append(strings.toString(), dataFile, Charsets.UTF_8);
String fileContent = Files.readFirstLine(dataFile, Charsets.UTF_8);
System.out.println(fileContent);
}
...
}
|
打印结果如下:
1
2
3
4
| g! start 263
Hello World Bundle start!
[I, use, guava, here]
[I, use, guava, here]
|
在felix的目录下,有个felix-cache目录,下面是各个bundle对应的文件夹,我们的save.txt就存放在bundle的data文件夹里面。
1
2
3
4
5
6
7
8
9
| $ cd felix-cache/bundle263/
$ ls -l
-rw-r--r-- 1 zhaozhiming staff 54 Jan 31 13:51 bundle.info
drwxr-xr-x 3 zhaozhiming staff 102 Jan 31 13:50 data
drwxr-xr-x 5 zhaozhiming staff 170 Jan 31 13:50 version0.0
$ ls -l data
-rw-r--r-- 1 zhaozhiming staff 21 Jan 31 13:50 save.txt
$ cat data/save.txt
[I, use, guava, here]
|